Hexo+Github+WebHook实现文章自动发布 1 背景描述
由于Halo更新到了2.0版本,博客增加了很多东西,应用市场、可插拔的插件,但是也明显感觉到Halo的定位在改变,从原来的单用户,到现在的多用户,Halo变成了一个建站的工具,琳琅满目的插件,逐渐逐渐不符合我的需求了。从halo v1版本最后一个版本1.6.1到2.18.0中间也尝试升级到2.0版本,始终有种水土不服的感觉。继续保持使用v1.6.1版本又担心博客年久失修。故此下定决心迁移到hexo。
2 关于Hexo Hexo 是一个静态网站生成器,用于创建博客和其他类型的网站。它基于 Node.js,主要特点如下:
快速和高效:Hexo 可以快速生成静态网页,这使得它在处理大量内容时非常高效。
Markdown 支持:Hexo 使用 Markdown 语法来撰写文章,使得写作变得简单和直观。
主题和插件:Hexo 提供了丰富的主题和插件支持,用户可以通过这些工具轻松自定义网站的外观和功能。
部署简便:Hexo 支持多种部署方式,包括 GitHub Pages、Netlify 和其他静态托管服务,简化了将网站发布到互联网的过程。
灵活性:由于是静态生成器,Hexo 可以与多种静态网站托管服务兼容,适合开发者和非技术用户。
总的来说,Hexo 是一个灵活且强大的工具,特别适合个人博客和小型网站的建设。—- 来自ChatGPT
3 部署Hexo 3.1 环境信息
阿里云服务器
OS:Ubuntu 22.04.2 LTS
Nginx:反向代理
Python Flask:创建webhook监听
主题:fluid
3.2 安装Git 1 2 3 4 5 $ sudo apt-get updatesudo apt-get install -y git
3.3 安装Nodejs 1 2 3 4 5 6 7 $ sudo apt-get install -y nodejs
更新npm源为淘宝
1 2 3 4 5 set registry https://registry.npmmirror.com
3.4 安装Hexo 3.4.1 安装Hexo 1 2 3 4 5 6 7 8 9 10 11 12 13 14 15 16 17 18 19 20 21 22 23
3.4.2 初始化博客 1 2 3 4 5 6 7 8 mkdir /web
3.4.4 配置博客
Hexo _config.yml关键配置项
服务启动端口
配置主题
3.4.5 使用systemctl管理Hexo 使用systemctl来管理hexo服务,创建/usr/lib/systemd/system/hexo.service配置文件并添加以下配置。创建完成后启动服务和设置开机启动
启动服务: systemctl start hexo
查看状态: systemctl status hexo
停止服务: systemctl stop hexo
设置开机启动: systemctl enable hexo
禁用开机启动: systemctl disable hexo
1 2 3 4 5 6 7 8 9 10 11 12 13 14 15 16 17 [Unit] Description =Hexo ServerAfter =network.target[Service] WorkingDirectory =/web ExecStart =/usr/local/bin/hexo server go Restart =alwaysStandardOutput =syslog StandardError =syslog SyslogIdentifier =hexoUser =web Group =web Environment =NODE_ENV=production[Install]
4 安装与配置Nginx 使用nginx 反向代理Hexo 和webhook。
4.1 安装nginx
Nginx 安装方法参考:【实战】Linux CentOS7 Nginx[安装&卸载&实战]
4.2 配置nginx
www.example.info nginx 配置文件参考
/ 请求转发至 Hexo 5000
/webhook 请求转发支 Python webhook 5050
1 2 3 4 5 6 7 8 9 10 11 12 13 14 15 16 17 18 19 20 21 22 23 24 25 26 27 28 29 30 31 32 33 34 35 36 37 38 39 40 41 42 43 44 45 server {if ($time_iso8601 ~ "^(\d{4})-(\d{2})-(\d{2})" ) {set $y $1 ;set $m $2 ;set $d $3 ;$d .log json;$host ;$remote_addr ;$proxy_add_x_forwarded_for ;$host ;$remote_addr ;$proxy_add_x_forwarded_for ;
4.3 使用systemctl管理nginx 使用systemctl来管理hexo服务,创建/usr/lib/systemd/system/nginx.service配置文件并添加以下配置。创建完成后启动服务和设置开机启动
启动服务: systemctl start nginx
查看状态: systemctl status nginx
停止服务: systemctl stop nginx
设置开机启动: systemctl enable nginx
禁用开机启动: systemctl disable nginx
1 2 3 4 5 6 7 8 9 10 11 12 13 14 15 16 17 18 19 20 [Unit] Description =The nginx HTTP and reverse proxy serverAfter =network-on line.target remote-fs.target nss-lookup.targetWants =network-on line.target[Service] Type =forkingPIDFile =/usr/apps/nginx/log/nginx.pidExecStartPre =/usr/apps/nginx/sbin/nginx -t -c /usr/apps/nginx/conf/nginx.confExecStart =/usr/apps/nginx/sbin/nginx -c /usr/apps/nginx/conf/nginx.confExecReload =/usr/apps/nginx/sbin/nginx -s reloadExecStop =/usr/apps/nginx/sbin/nginx -s stopExecQuit =/usr/apps/nginx/sbin/nginx -s quitPrivateTmp = true [Install]
5 创建Python webhook代码
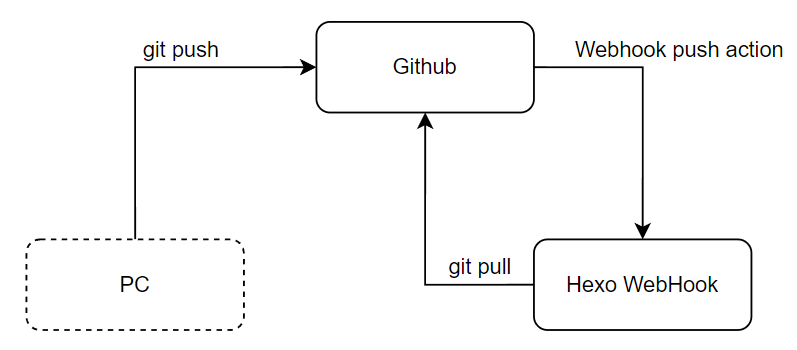
使用Python Flask模块创建Webhook服务,监听Github repository push更新通知事件。当webhook服务监听到有githubb 发过来的push更新事件时,在服务器上执行git pull命令拉取最新的仓库。
Hexo 支持新增的md文件动态渲染和显示。
5.1 Python WebHoook代码
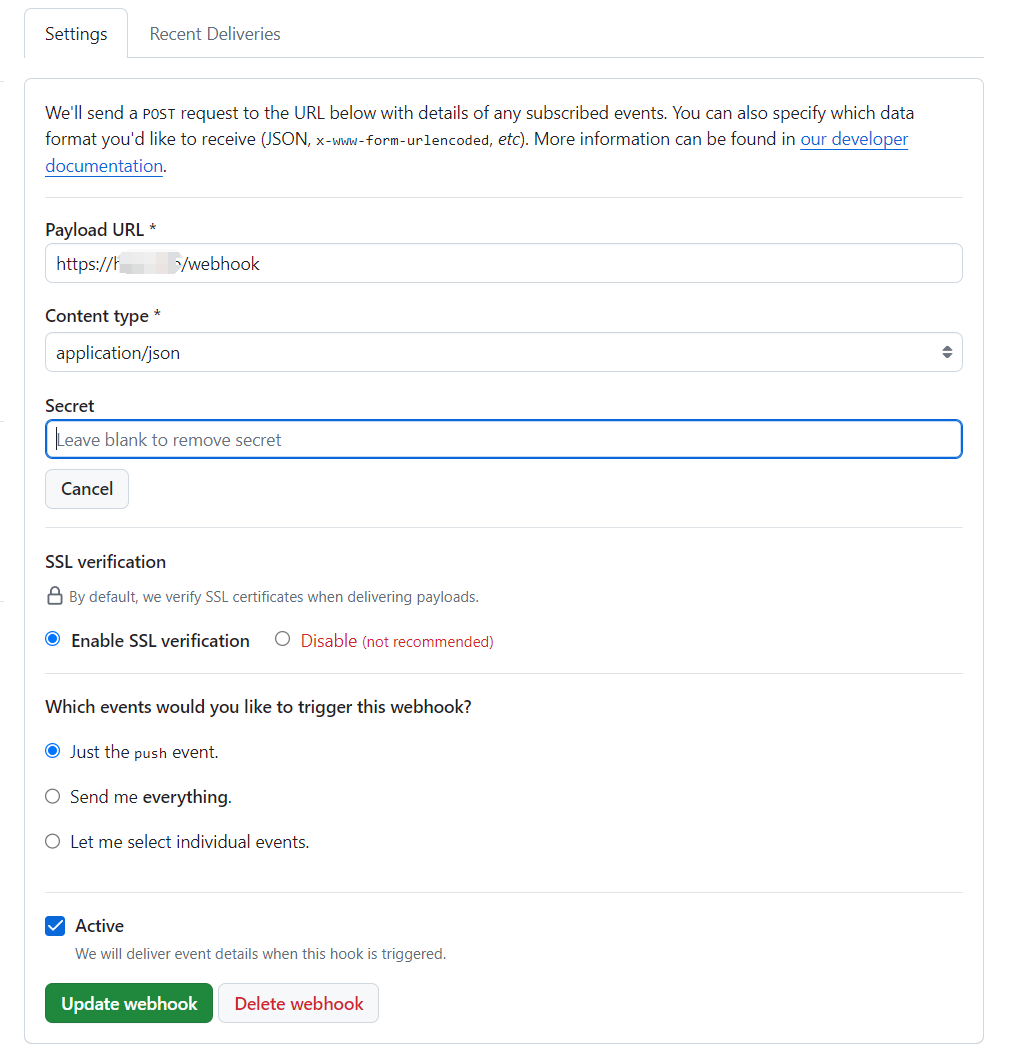
认证鉴定;Python代码中的WEBHOOK_SECRET变量需要进行设置,后续在配置github webhook时SECRET要与Python代码中的WEBHOOK_SECRET保持一致。
1 2 3 4 5 6 7 8 9 10 11 12 13 14 15 16 17 18 19 20 21 22 23 24 25 26 27 28 29 30 31 32 33 34 35 36 37 38 39 40 41 42 43 44 45 46 47 48 49 50 51 52 53 54 55 56 57 58 59 60 61 62 63 64 65 66 67 68 69 70 71 72 from flask import Flask, requestimport os, loggingimport hmacimport hashlibimport subprocess"设置 WebHook SECRET" '/run.log' format ='%(asctime)s - %(levelname)s - %(message)s' )def verify_signature (payload, signature ):'utf-8' )return hmac.compare_digest(f'sha1={computed_signature} ' , signature)def action ():try :'git' , 'pull' , 'origin' , 'main' ], cwd='/web' , capture_output=True , text=True )if result.stderr:f'Git pull error: {result.stderr} ' )else :f'successfully Git pull output: {result.stdout} ' )except Exception as e:f'Exception occurred while running git pull: {e} ' )@app.route("/webhook" , methods=['post' ] def webhook ():'X-Forwarded-For' ) dict (request.headers)'X-Hub-Signature' )if not signature:f'IP: {ip_address} - Signature missing' )return 'Signature missing' , 400 elif not verify_signature(payload, signature):f'IP: {ip_address} - Invalid signature' )return 'Invalid signature' , 400 elif verify_signature(payload, signature):f'IP: {ip_address} - Webhook event received and verified successfully.' )return 'ok' , 200 if __name__ == "__main__" :"0.0.0.0" , port=5050 )
5.2 使用systemctl管理webhook 使用systemctl来管理hexo服务,创建/usr/lib/systemd/system/hexo-webhook.service配置文件并添加以下配置。创建完成后启动服务和设置开机启动
启动服务: systemctl start hexo-webhook
查看状态: systemctl status hexo-webhook
停止服务: systemctl stop hexo-webhook
设置开机启动: systemctl enable hexo-webhook
禁用开机启动: systemctl disable hexo-webhook
1 2 3 4 5 6 7 8 9 10 [Unit] Description =Hexo WebHook Auto Git PullAfter =network.target[Service] User =rootExecStart =/usr/bin/python3 /opt/tools/webhookGit/app.pyRestart =always[Install]
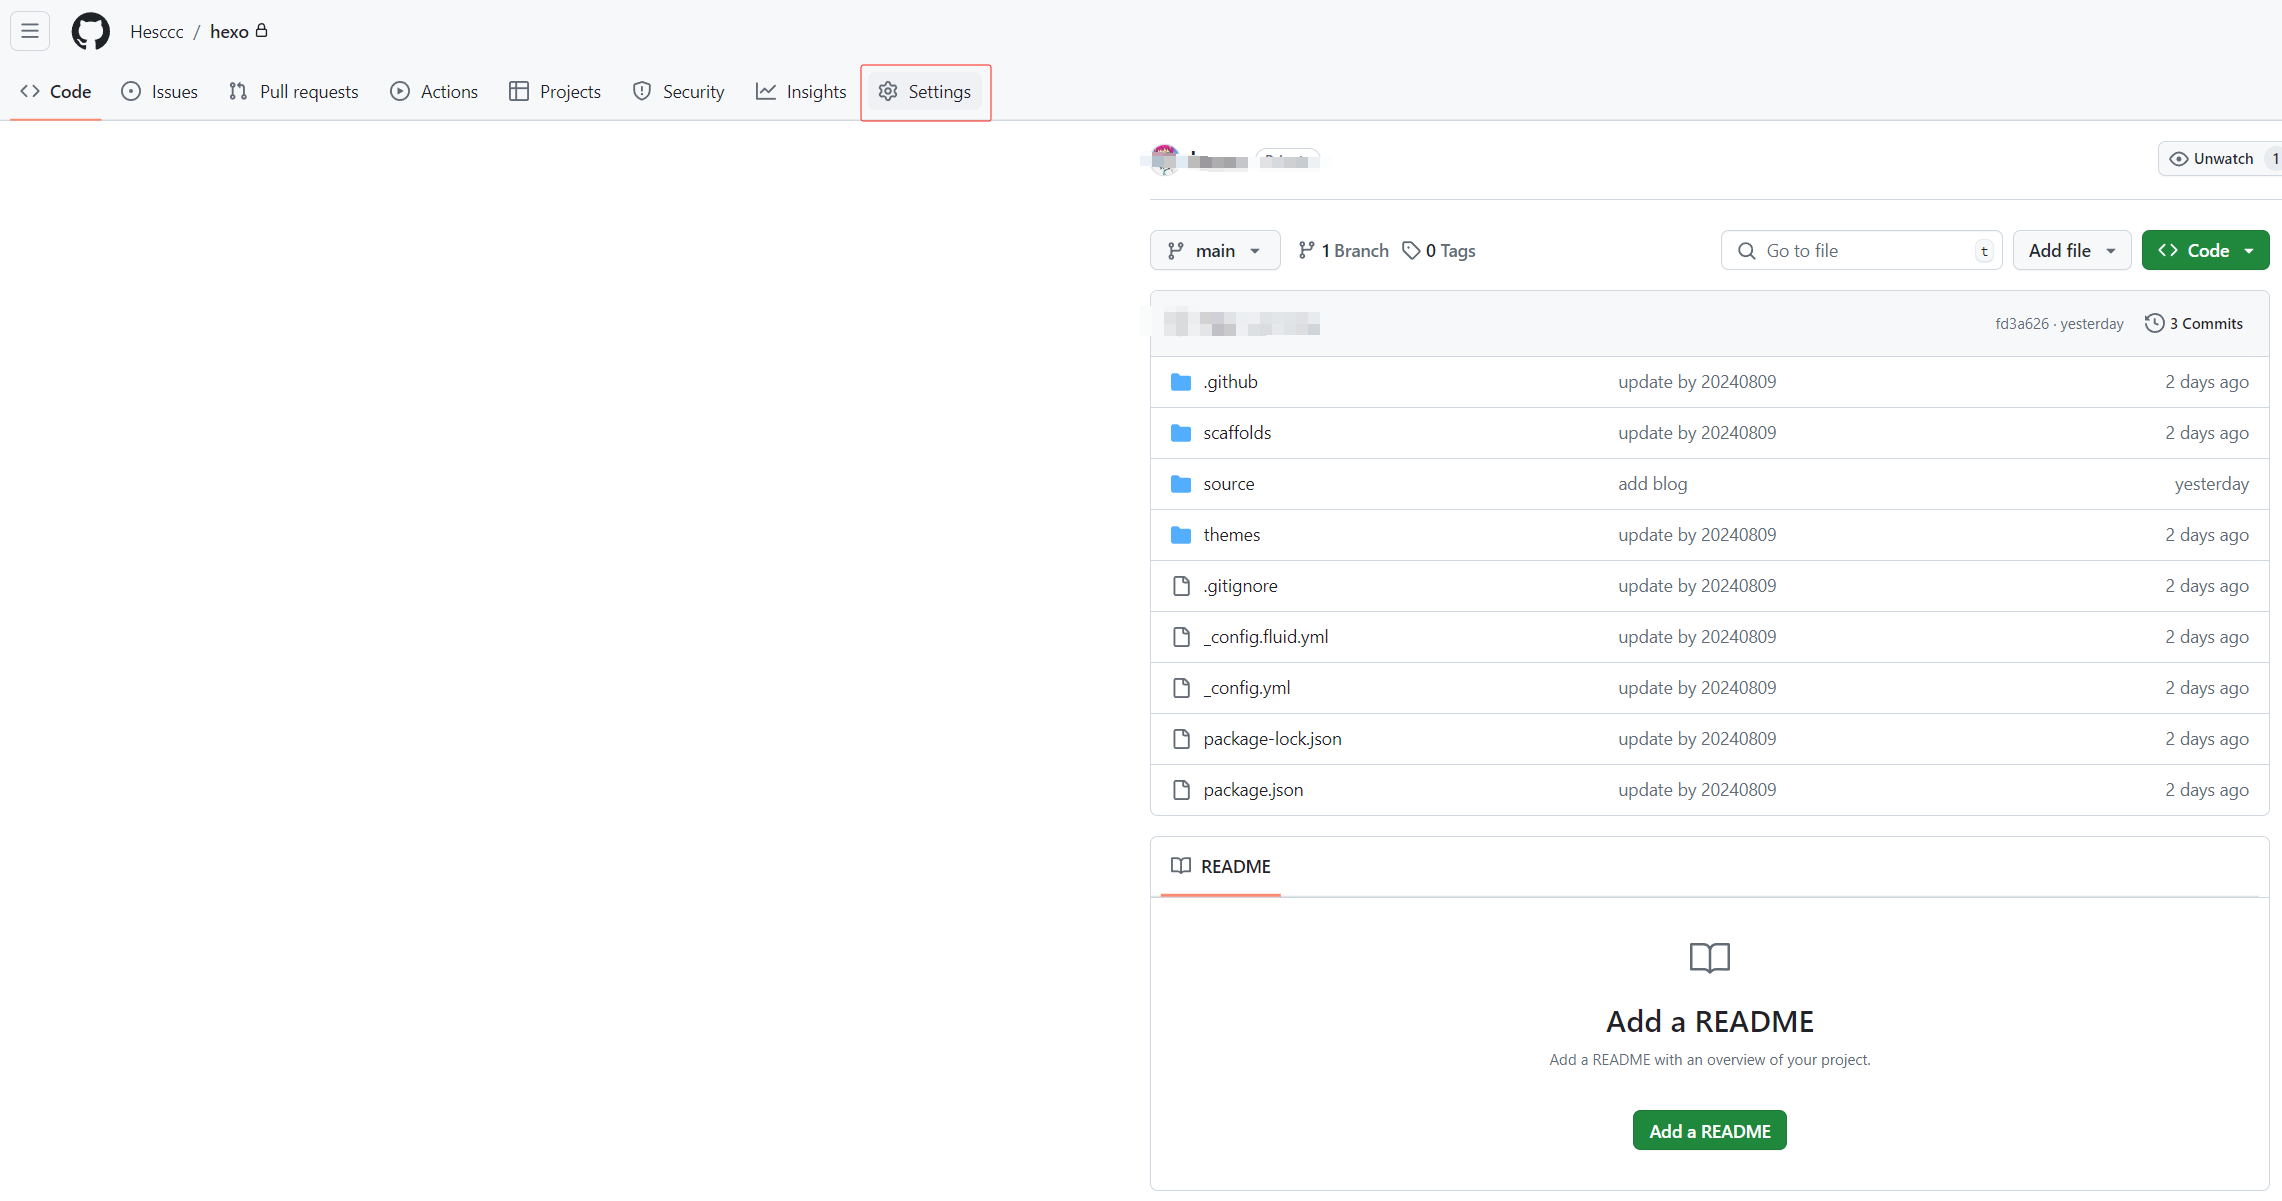
6 Github repository配置 6.1 repository webhook配置
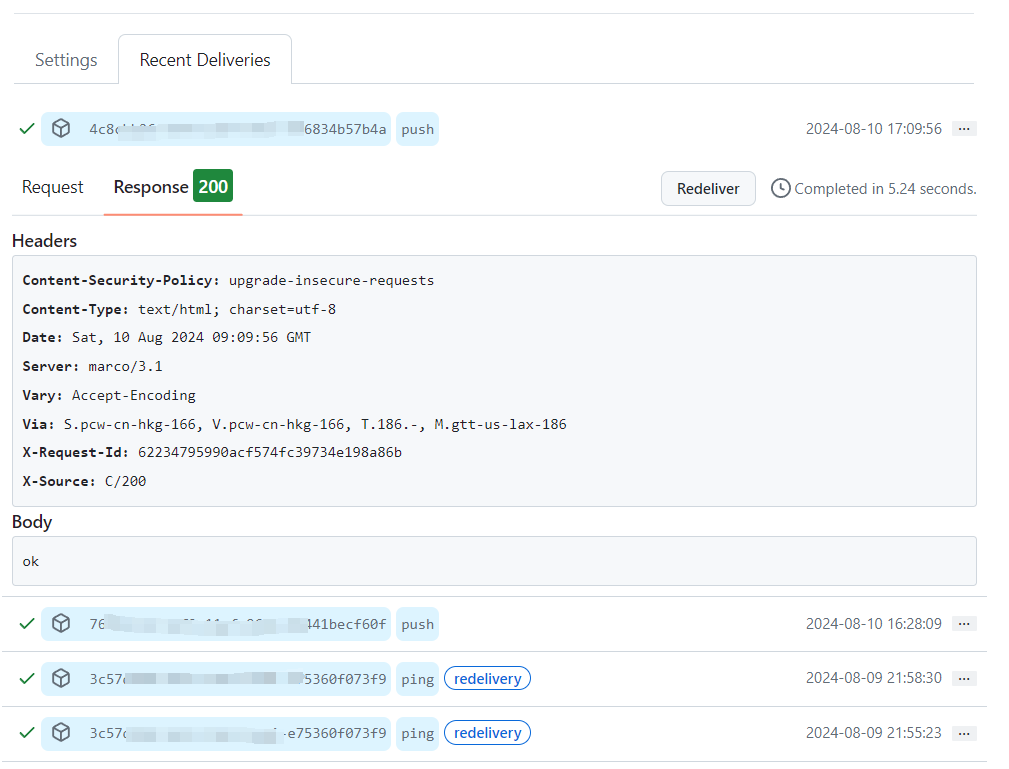
运行日志,能看到返回的body为ok,说明流程是正常的。