【实战】Nginx 安装配置&卸载&实战

【实战】Linux CentOS7 Nginx[安装&卸载&实战]
1 准备安装环境
准备安装依赖:
1 | |
等依赖安装完成后,下载nginx,可以从官网找到合适的版本:Nginx

使用wget命令下载nginx-1.16.1.tar.gz源代码编译安装包,使用yum命令安装wget命令。
1 | |
解压:
1 | |
2 开始安装
具体是想默认配置安装还是自定义配置,可自行斟酌。
2.1 默认安装
1 | |
2.2 配置具体用户和用户组
1 | |
2.3 解决安装依赖报错
1 | |
1 | |
1 | |
1 | |
2.4 不依赖用户组
1 | |
2.5 进行安装
1 | |
然后就是安装成功了!!
3 nginx基本操作
1 | |

4 nginx设置开机启动
在/etc/init.d目录下创建nginx脚本
1 | |
nginx内容如下:
1 | |
给nginx文件添加执行权限
1 | |
添加开机启动
1 | |
5 FAQ常见问题
如果在第一次启动的时候遇到 nginx: [emerg] getpwnam(“nginx”) failed这个错误,没有安装nginx用户导致的无法启动,需要添加nginx用户,按下面命令操作即可,然后再次启动即可
1 | |

6 使用systemctl管理Nginx服务
创建/usr/lib/systemd/system/nginx.service配置文件,使用systemctl管理Nginx服务
1 | |
systemctl 操作
2
3
4
5systemctl start nginx //启动
systemctl stop nginx //停止
systemctl status nginx //查看状态
systemctl enbale nginx //启用开机启动
systemctl disable nginx //禁用开机启动
7 Nginx 卸载
7.1 检查Nginx是否在运行
1 | |
7.2 停止Nginx进程
1 | |
7.3 查找Nginx相关文件和目录
1 | |
7.4 备份Nginx /conf目录中的配置文件
1 | |
7.5 删除Nginx相关配置文件和目录
1 | |
7.6 补充:检查&删除nginx.service配置文件
1 | |
7.7 补充:检查&删除/etc/init.d/nginx开机自启脚本
1 | |
7.8 补充:检查/etc/rc.local配置文件是否有添加Nginx开机启动命令
1 | |
7.9 使用yum命令安装Nginx可以再用yum指令卸载
1 | |
8 实战案例
8.1 Nginx 设置反向代理
8.1.1 Nginx 主配置文件
通过nginx设置反向代理,代理到halo博客web服务端口,通过nginx.conf主配置文件加载
host目录下的nginx配置文件。
1 | |
8.1.2 host/cloud.conf
cloud.example.info域名解析nginx配置文件
1 | |
8.2.3 host/blog.conf
example.info www.example.info域名解析nginx配置文件
1 | |
8.2.4 host/http-to-https.conf
将http请求转成https协议
1 | |
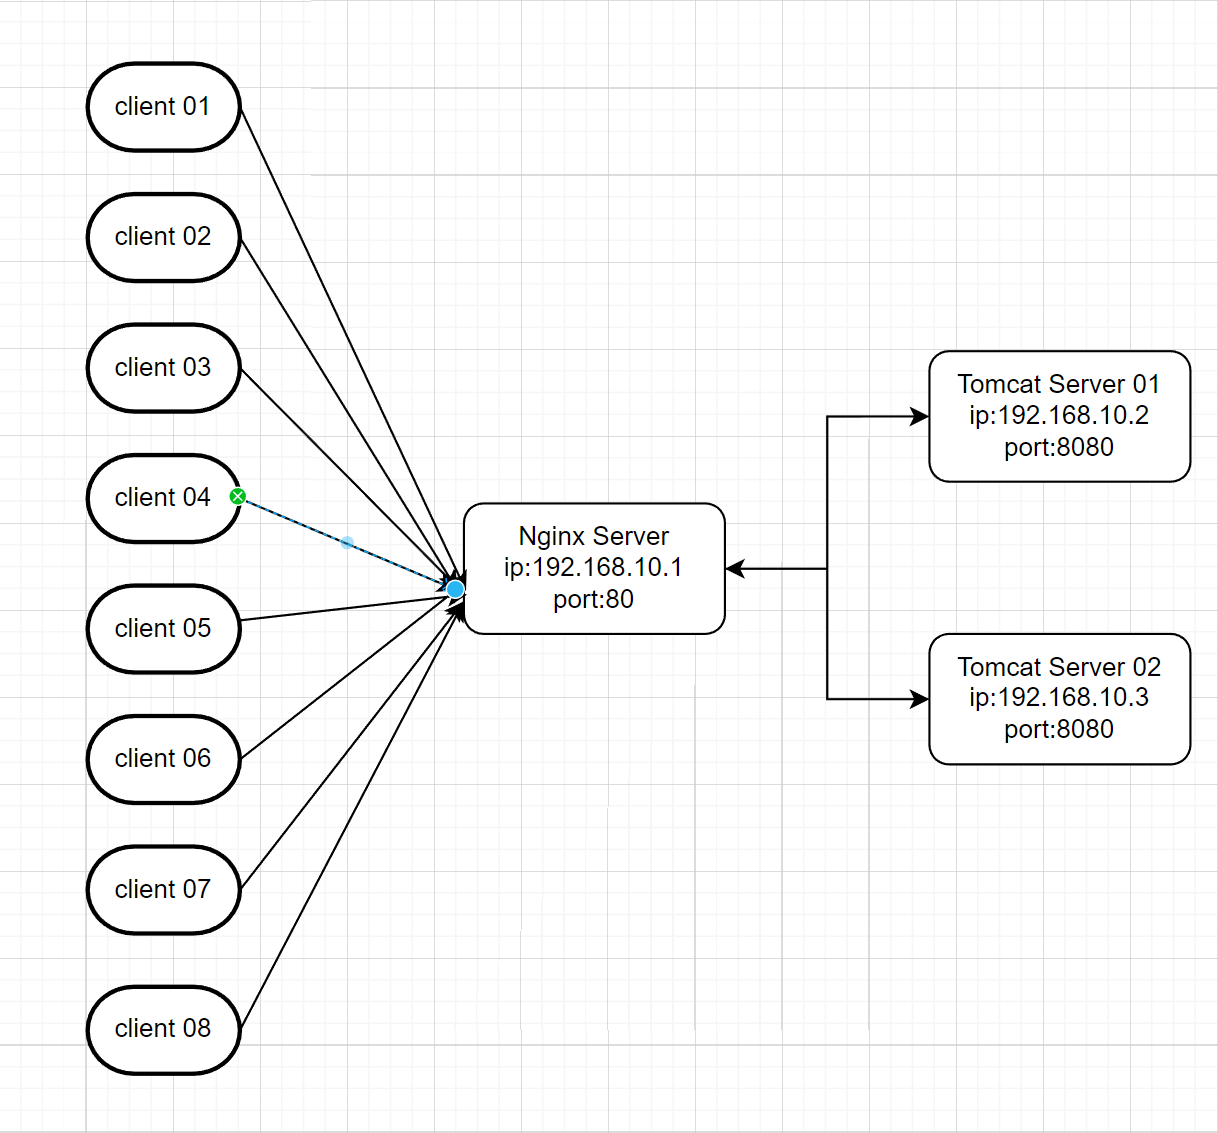
8.2 Nginx + Tomcat集群[实现负载均衡]
8.2.1 环境
CentOS:7.29
nginx:nginx-1.18.0
apache-tomcat:6.0.33
8.2.2 效果流程图

8.2.3 配置文件
nginx.conf 主配置文件
1 | |
host/tomcat-cluster.conf
1 | |
8.3 传输层 UDP&TCP协议转发和负载均衡
8.3.1 补充:OSI七层协议图
| OSI七层网络模型 | TCP/IP四层概念模型 | 对应网络协议 |
|---|---|---|
| 应用层(Application) | 应用层 | HTTP、TFTP, FTP, NFS, WAIS、SMTP |
| 表示层(Presentation) | 应用层 | Telnet, Rlogin, SNMP, Gopher |
| 会话层(Session) | 应用层 | SMTP, DNS |
| 传输层(Transport) | 传输层 | TCP, UDP |
| 网络层(Network) | 网络层 | IP, ICMP, ARP, RARP, AKP, UUCP |
| 数据链路层(Data Link) | 数据链路层 | FDDI, Ethernet, Arpanet, PDN, SLIP, PPP |
| 物理层(Physical) | 数据链路层 | IEEE 802.1A, IEEE 802.2到IEEE 802.11 |

8.3.2 言归正传:nginx.conf配置文件
安装的nginx版本需要有ngx_stream_core_module模块,才能实现UDP和TCP协议转发。
stream nginx.conf主配置文件,加载514.conf配置文件。
2
3
4
5
6
7
8
9stream { # 需要与http同一级
log_format basic 'time=[$time_local] remote_addr=$remote_addr ' # 设置basic日志格式
'protocol=$protocol '
'status=$status '
'bytes_sent=$bytes_sent '
'bytes_received=$bytes_received '
'session_time=$session_time'
include /usr/local/nginx/conf/stream/*.conf; # 加载udp.d目录下的配置文件
}
8.3.3 514.conf
TCP/UDP协议 514 端口转发 配置文件 实现514端口数据流量负载均衡
2
3
4
5
6
7
8
9
10
11
12
13
14
15
16
17
18
19
20
21
22
23
24
25
26
27
28
29
30
31
32
33
34
35
36
37
38
39
40
41
42
43upstream udp_514_server {
# 希负载均衡策略可以通过客户端 IP($remote_addr)实现简单的会话保持,其可将同一IP客户端始终转发给同一台后端服务器。
hash $remote_addr;
server 10.10.0.102:514 weight=5;
server 10.10.0.103:514 weight=5;
# weight 权重值
# udp不建议添加<max_fails>和<fail_timeout>参数
}
upstream tcp_514_server {
# 希负载均衡策略可以通过客户端 IP($remote_addr)实现简单的会话保持,其可将同一IP客户端始终转发给同一台后端服务器。
hash $remote_addr;
server 10.10.0.102:514 weight=5 max_fails=3 fail_timeout=30s;
server 10.10.0.103:514 weight=5 max_fails=3 fail_timeout=30s;
# weight 权重值
# max_fails:在服务器被标记为不可用的时间内必须发生的失败尝试次数(默认为1次尝试)
# fail_timeout:多次尝试失败而将服务器标记为不可用的时间,以及将服务器标记为不可用的时间(默认为10秒)
# udp不建议添加<max_fails>和<fail_timeout>参数
}
# udp 514 端口代理
server {
listen 514 udp; # 监听udp 514端口
proxy_timeout 1s; # 获取被代理服务器的响应最大超时时间为1s
proxy_connect_timeout 1s; # 与被代理服务器建立连接的超时时间为1s
access_log /var/log/nginx/udp_514_server.log basic;
error_log /var/log/nginx/udp_error_514_server.log;
proxy_pass udp_514_server; # 代理upstream名称
}
# tcp 514 端口代理
server {
listen 514; # 监听tcp 514端口
proxy_timeout 1s; # 获取被代理服务器的响应最大超时时间为1s
proxy_connect_timeout 1s; # 与被代理服务器建立连接的超时时间为1s
proxy_next_upstream on; # 当被代理的服务器返回错误或超时时,将未返回响应的客户端连接请求传递给upstream中的下一个服务器
proxy_next_upstream_tries 3; # 转发尝试请求最多3次
proxy_next_upstream_timeout 10s; # 总尝试超时时间为10s
proxy_socket_keepalive on; # 开启SO_KEEPALIVE选项进行心跳检测
access_log /var/log/nginx/tcp_514_server.log basic;
error_log /var/log/nginx/tcp_error_514_server.log;
proxy_pass tcp_514_server; # 代理upstream名称
}