Splunk奇巧淫技那些事
![]()
Splunk奇巧淫技那些事
0x00 Splunk 数据转发/过滤/处理那些事
A Splunk 将数据转发到第三方系统
工作节点:HF OR Indexer
NO Indexer Cluster流程:
props -> transforms -> outputs
props.conf transforms.conf outputs.conf 确定哪些数据进行数据转发 配置数据转发策略 配置目标ip端口消息
outputs.conf1
2
3
4
5
6
7
8
9
10# 默认数据转发组
[syslog]
defaultGroup = syslogoutputsGroup
# 配置syslog数据转发目标地址
[syslog:syslogoutputsGroup]
type = udp
# 协议
server = 10.203.19.22:514
# 目标ip和端口props.conf1
2
3
4
5
6
7
8
9
10
11# 需要转发的sourcetype名称
[sourcetype::cosmo_syslog]
TRANSFORMS-syslog = splunk_syslog_outpust
# 需要转发的sourcetype名称
[sourcetype::cosmo_cisco:asa]
TRANSFORMS-cisco-asa = splunk_syslog_outpust
# 需要转发的sourcetype名称
[sourcetype::cosmo_cisco_asa_anquan]
TRANSFORMS-cisco_asa_anquan] = splunk_syslog_outpusttransforms.conf1
2
3
4[splunk_syslog_outpust]
REGEX = .
DEST_KEY = _SYSLOG_ROUTING
FORMAT = syslogoutputsGroup
B Splunk 基于source过滤数据
工作节点:HF OR Indexer
NO Indexer Cluster设置transforms.conf创建过滤数据规则
问题:将普罗米修斯数据接入到splunk系统中发现数据量非常庞大(有1560个指标项),真正使用到的指标项不到100个,需要过滤掉不需要的指标
props.conf1
2
3
4
5
6
7
8
9
10
11[prometheus_filter]
# prometheus_filter sourcetype 解析规则
TIME_FORMAT = %s%3N
TIME_PREFIX = }\s[\d\-\.]+\s
NO_BINARY_CHECK = true
SHOULD_LINEMERGE = false
pulldown_type = 1
category = Metrics
EXTRACT-metric_name,num1,num2 = ^(?P<metric_name>[^\{]+)[^\}\n]*\}\s+(?P<num1>[^ ]+)\s+(?P<num2>.+)
# 指定transforms.conf 配置内容
TRANSFORMS-set = setnull,conformtransforms.conf1
2
3
4
5
6
7
8
9
10
11
12[conform]
REGEX = container_cpu_load_average_10s|container_cpu_usage_seconds_total|container_fs_limit_bytes|container_fs_usage_bytes|container_memory_cache|container_memory_usage_bytes|container_memory_working_set_bytes|container_network_receive_bytes_total|container_network_transmit_bytes_total|container_spec_memory_limit_bytes|jvm_gc_collection_seconds_count|jvm_gc_collection_seconds_sum|jvm_memory_bytes_used|jvm_memory_pool_bytes_max|jvm_memory_pool_bytes_used|jvm_threads_current|jvm_threads_deadlocked|jvm_threads_peak|kube_pod_container_status_ready|kube_pod_container_status_running|kube_pod_container_status_terminated|kube_pod_container_status_waiting|machine_cpu_cores|machine_memory_bytes|mysql_global_status_aborted_clients|mysql_global_status_commands_total|mysql_global_status_innodb_data_fsyncs|mysql_global_status_innodb_data_reads|mysql_global_status_innodb_data_writes|mysql_global_status_select_full_join|mysql_global_status_select_scan|mysql_global_status_slow_queries|mysql_global_status_sort_scan|mysql_global_status_threads_connected|mysql_global_status_threads_created|nginx_connections_accepted|nginx_connections_active|nginx_connections_handled|nginx_http_requests_total|node_network_info|rabbitmq_channelsTotal|rabbitmq_connectionsTotal|rabbitmq_consumersTotal|rabbitmq_exchangesTotal|rabbitmq_fd_total|rabbitmq_fd_used|rabbitmq_queue_messages_ready_total|rabbitmq_queue_messages_total|rabbitmq_queue_messages_unacknowledged_total|rabbitmq_queuesTotal|rabbitmq_sockets_total|rabbitmq_sockets_used|rabbitmq_up|redis_blocked_clients|redis_commands_processed_total|redis_connected_clients|redis_evicted_keys_total|redis_expired_keys_total|redis_keyspace_hits_total|redis_keyspace_misses_total|redis_memory_used_bytes|zk_max_latency|zk_num_alive_connections|zk_open_file_descriptor_count|zk_outstanding_requests|zk_up|zk_watch_count|zk_znode_count
# 需要采集的数据,通过正则表达式匹配。
# 内容为_raw内容 math(_raw,REGEX)
DEST_KEY = queue
FORMAT = indexQueue
# 转发到索引队列
[setnull]
REGEX = .
DEST_KEY = queue
FORMAT = nullQueue # 传递到nullQueue
C Splunk 基于Host字段过滤数据
实现原理:forwarder采集数据发送到HeavyForwarder上进行解析,由此在HeavyForwarder创建数据过滤规则。
工作节点:HF OR Indexer
NO Indexer Cluster
编辑
props.conf使用
SSH工具登录到Heavy Forwarder服务器编辑
/opt/splunk/etc/apps/Splunk_TA_windows/local/props.conf(如文件不存在则新建)。在文件末尾添加以下内容:
1
2
3
4
5[host::example_hostname] # example-hostname 为排除数据的agent主机名
TRANSFORMS-filterhostname = conform,setnull
[host::example_ip] # example-IP 为排除数据的agentIP地址
TRANSFORMS-filterIP = conform,setnull编辑
transforms.conf编辑
/opt/splunk/etc/apps/Splunk_TA_windows/local/transforms.conf(如文件不存在则新建)。在文件末尾添加以下内容:
1
2
3
4
5
6
7
8
9
10>[conform]
>REGEX = .
>DEST_KEY = queue
>FORMAT = indexQueue
>[setnull]
># 数据不保存,转发到空消息队列
>REGEX = ((\<EventID\>4703\<\/EventID\>)|(EventCode=4703))
>DEST_KEY = queue
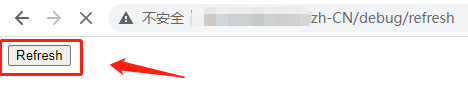
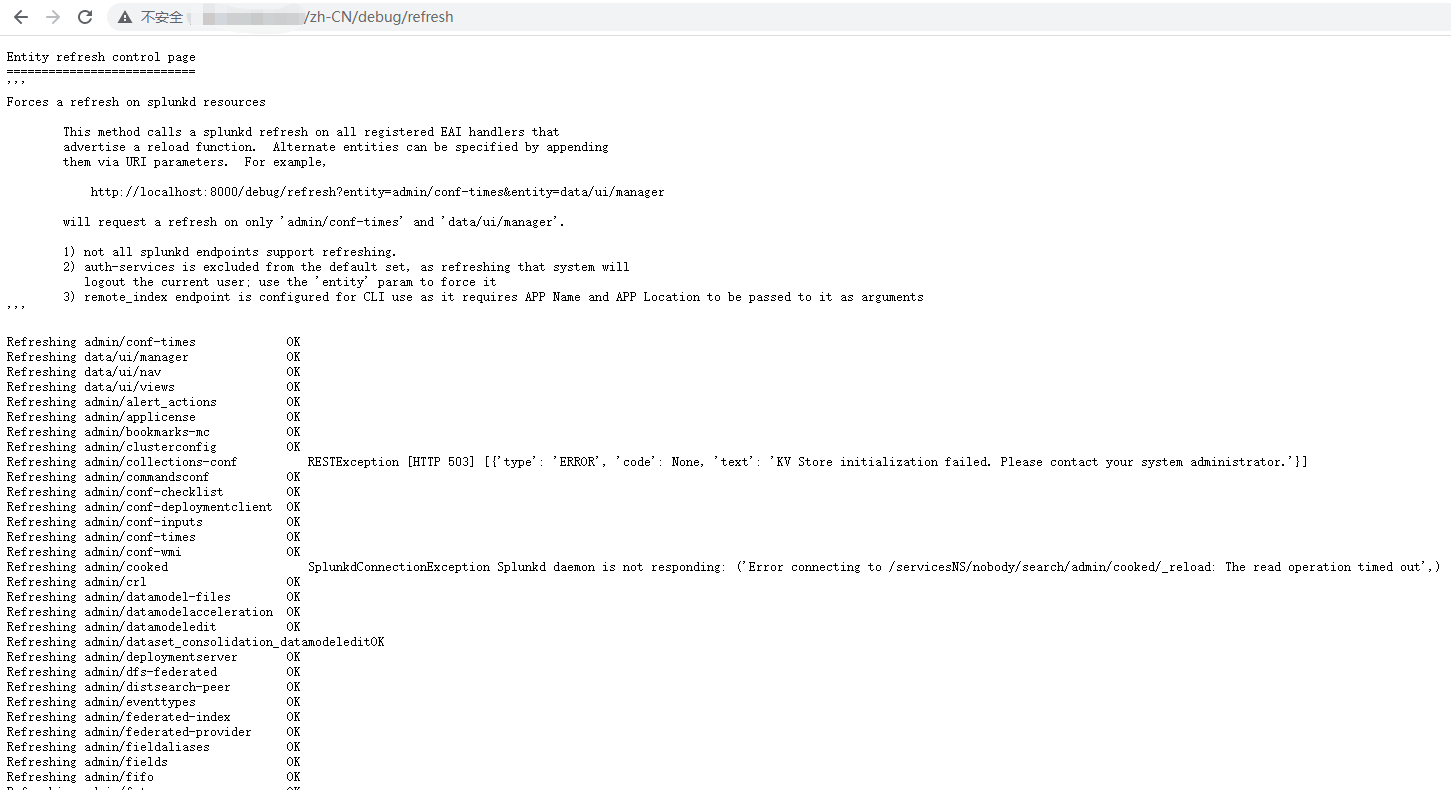
>FORMAT = nullQueue访问HF refresh web界面刷新配置文件
http://HeavyForwarderIP:8000/zh-CN/debug/refresh
# 需要使用admin账号登入
界面如下:
完成效果如下:
D Splunk 数据拆分成不同的sourcetyp
不同种类的网络安全数据全部通过udp 514端口进行数据接收,创建采集配置无法指定多个sourcetype,可以根据source字段进行sourcetype拆分,匹配正则表达式拆分sourcetype
工作节点:HF OR Indexer
NO Indexer Cluster
props.conf1
2
3[source::example_udp:514]
SHOULD_LINEMERGE = false
TRANSFORMS-changesourcetype = mcafee_ips:syslog,f5_bigip:syslog,asiainfo:tdatransforms.conf1
2
3
4
5
6
7
8
9
10
11
12
13
14[asiainfo:tda]
REGEX = CEF:\d\|(Asiainfo Security|AsiaInfo|Trend Micro)\|(Control Manager|Deep Discovery Analyzer|Deep Security Agent|Deep Security Manager|TDA|Deep Discovery Email Inspector)
FORMAT = sourcetype::asiainfo:tda
DEST_KEY = MetaData:Sourcetype
[f5_bigip:syslog]
REGEX = \tASM\:CEF\:\d|F5|ASM
FORMAT = sourcetype::f5_bigip:syslog
DEST_KEY = MetaData:Sourcetype
[mcafee_ips:syslog]
REGEX = SyslogAlertForwarder:\s\|\d*
FORMAT = sourcetype::mcafee:ips:syslog
DEST_KEY = MetaData:Sourcetype
E Splunk 数据转发到多台indexer节点(transforms)
配置文件所在节点即工作节点:HF
props.conf1
2[splunktcp]
TRANSFORMS-routing = route_alloutputs.conf1
2
3
4
5
6
7
8
9
10
11
12
13
14
15
16
17# 注意点:不要加defaultGroup配置,否则数据优先给defaultGroup组发送。
# [tcpout]
# defaultGroup = idxc_dv
# 普通数据转发
[tcpout:mss_idx]
disabled = false
server = 10.10.0.104:9997
# 索引器发现
[tcpout:idxc_dv]
indexerDiscovery = indexer_cluster_discovery
[indexer_discovery:indexer_cluster_discovery]
# 密码:idx_dv
pass4SymmKey = $7$Vys7w3j3T5J1N0u5fr9JYbHGQe5Zh7Hef65c/I4vUOj8THEmBJI=
master_uri = https://10.10.0.121:8089补充点:
master节点上面配置索引器发现配置文件:
$SPLUNK_HOME/etc/system/local/server.conf1
2
3
4
5[indexer_discovery]
# 密码:idx_dv
pass4SymmKey = $7$8OOMpbWXJscp69HifzghTxen+OgyLkvOkf51+1ioUDf0cyCjfRw=
polling_rate = 10
indexerWeightByDiskCapacity = falsetransforms.conf1
2
3
4[route_all]
REGEX=(.)
DEST_KEY=_TCP_ROUTING
FORMAT=idxc_dv,mss_idx
F Splunk 数据转发到多台indexer节点(inputs)
用于转发HF节点采集syslog落盘数据
工作节点:HF
outputs.conf1
2
3
4
5
6
7
8
9[tcpout:mss_idxc]
server=server1:9997,server2:9997
[tcpout:local_idxc]
server=server3:9997,server4:9997
# 注意点:不要加defaultGroup配置,否则不生效
# [tcpout]
# defaultGroup = primary_indexersinputs.conf1
2
3
4
5
6
7
8
9[monitor://.../file1.log]
_TCP_ROUTING = local_idxc
[monitor://.../file2.log]
_TCP_ROUTING = mss_idxc
[monitor://.../file3.log]
_TCP_ROUTING = local_idxc,mss_idxc
# 也可以配置多个outputs转发
0x01 SplunkUF修改8089端口(管理端口)
A 修改web.conf配置文件
查看/opt/splunkforwarder/etc/system/local/web.conf文件是否存在
1 | |
如果web.conf文件不存在将../default/下面的web.conf 复制到local目录下
1 | |
找到mgmtHostPort配置项并修改
1 | |
B 重启splunkforwarder服务
/opt/splunkforwarder/bin/splunk start
C 查看端口是否修改成功
1 | |
0x02 Splunk_TA_nix不能执行CPU.sh问题
问题:Splunk_TA_nix add-on下发到Linux Centos7系统上没有采集到cpu性能数据,发现缺少相关命令需要在linux系统上安装以下命令
1 | |
0x03 SplunkUF系统克隆导致主机名和GUID相同
A 方式一
删除 $SPLUNK$/etc/instance.cfg (里面记录了guid,也就是客户端名称)
删除 server.conf里面的实例名称记录,inputs.conf里面的主机名称记录
重启 forwarder服务
B 方式二
重新安装SplunkUniversalForwarder
1 | |
C 方法三
基于splunk clone-prep-clear-config命令清除splunk配置信息创建Linux和Windows脚本
提示:不能修改脚本名称,查找进程是否运行使用Splunk关键字进行查找
linux:clear-Splunkforwarder-config.sh
1 | |
Windows:clear-Splunkforwarder-config.bat
1 | |
0x04 修改每个CPU的最大并发搜索次数
2
3
4
5
6vim /opt/splunk/system/local/limits.conf
cat /opt/splunk/system/local/limits.conf
[search]
max_searches_per_cpu = 1 # 默认值为1
# 每个CPU的最大并发搜索次数
0x05 关于Splunk 重启日志也会存放在index里面
1 | |
0x06 查看告警邮箱是否发送
1 | |
0x07 关于字段重命名注意点
字段重命名:不能设置多个字段名称重命名为同一个字段名称
重写字段值:如果有设置多个字段名称重命名为同一个字段名称,使用勾选此选项字段重命名。
0x08 仪表板设置隐藏图表(并传递传递参数)
1 | |
0x09 Splunk web刷新配置文件url
1 | |
0x0a 修改index存放路径
A 修改splunk-launch.conf配置文件
1 | |
B 创建数据保存目录
1 | |
0x0b Splunk License 文件保存路径
$SPLUNK_HOME/etc/licenses/enterprise/Splunk.License.lic
0x0c outputlookup小技巧
1 | |
0x0d 创建UF资产表SPL
1 | |
0x0e Splunk enterprise security CLI安装命令
1 | |
0x0f Splunk 修改密码
A Splunk 7.1以下版本修改admin密码
如果忘记管理员密码,可以重置。需要有服务器的访问权限。
方法
1 | |
B Splunk 7.1以上版本修改admin密码
如果您使用的是Splunk 7.1以上的版本,需要使用<user-seed.conf 创建管理员凭据>方法重置admin密码。
在7.1以前的版本中,缺少$SPLUNK_HOME/etc/passwd文件, Splunk会将密码重置为”changeme”。但是在7.1上版本此方法已失效。
1. 您需要保存$SPLUNK_HOME/etc/passwd文件,并删除原始文件。
1 | |
2.编辑$SPLUNK_HOME/etc/system/local/user-seed.conf配置文件(不存在则新建)。
添加一个名为[user_info]章节,并指定管理员用户和您希望使用的密码。
1 | |
3.然后重新启动Splunk,将会生成一个新的$SPLUNK_HOME/etc/passwd文件。
1 | |
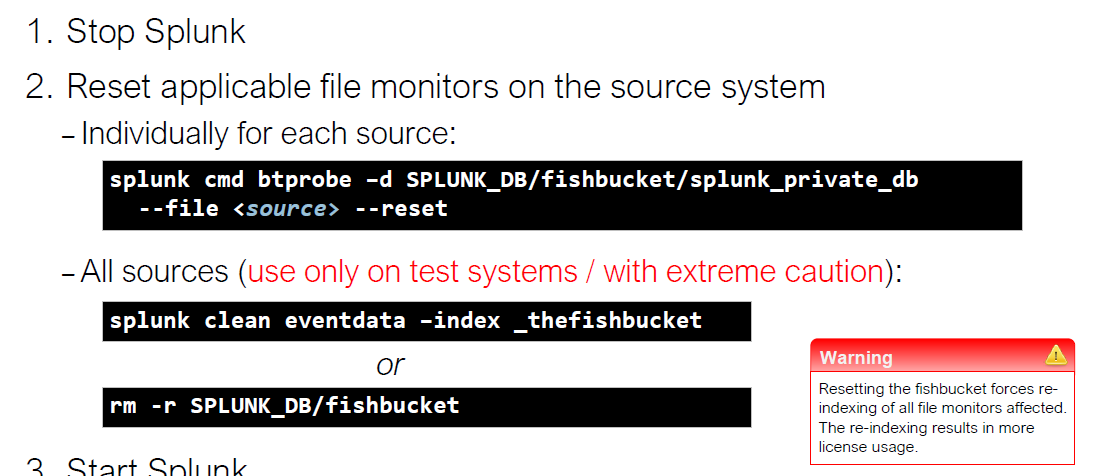
0x0G 重新采集数据方法
- 针对单个日志文件
- stop splunk
- splunk cmd btprobe -d $SPLUNK_DB/fishbucket/splunk_private_db –file <source> –reset
- start splunk
- 全部日志文件
- stop splunk
- splunk clean eventdata -index _thefishbucket
- rm -rf $SPLUNK_DB/fishbucket
- start splunk